
When making spider web cookie stamp cookies an easy recipe, the first step is selecting the perfect one. I remember the first time I ventured into this delightful world of cookie stamping, overwhelmed by the variety available. From intricate designs to simple patterns, the choices seemed endless.
I eventually settled on a stamp that featured a classic spider web design, complete with a tiny spider perched in the center. The moment I pressed it into my dough, I knew I had made the right choice. The key is to look for a visually appealing stamp made from high-quality materials.
Silicone stamps are particularly significant because they provide a clean impression and are easy to clean. Another essential factor to consider is the size of the stamp. I once made the mistake of choosing a too large stamp for my cookie cutter, resulting in a chaotic mess of dough.
The ideal stamp should fit comfortably within your chosen cookie cutter, allowing for a balanced design that won’t overwhelm the cookie. Additionally, consider the depth of the design; deeper impressions tend to hold icing better, which is essential for achieving that stunning spider web effect later on. So, select a stamp that resonates with your vision for these spooky treats.
If you love delicate and elegant cookies, you might also enjoy The Best Madeline Cookies Recipe, a classic treat with a buttery, airy texture.
Key Takeaways
- Choose a cookie stamp with a precise and intricate spider web design for the best results.
- Chill the cookie dough before rolling and stamping to prevent sticking
- Use a light touch when rolling and stamping the dough to create clean and defined spider web patterns
- Bake the cookies at the right temperature and time to achieve a perfect texture and color
- Get creative with different icing colors and decorations to make your spider web cookies stand out
Preparing the Cookie Dough
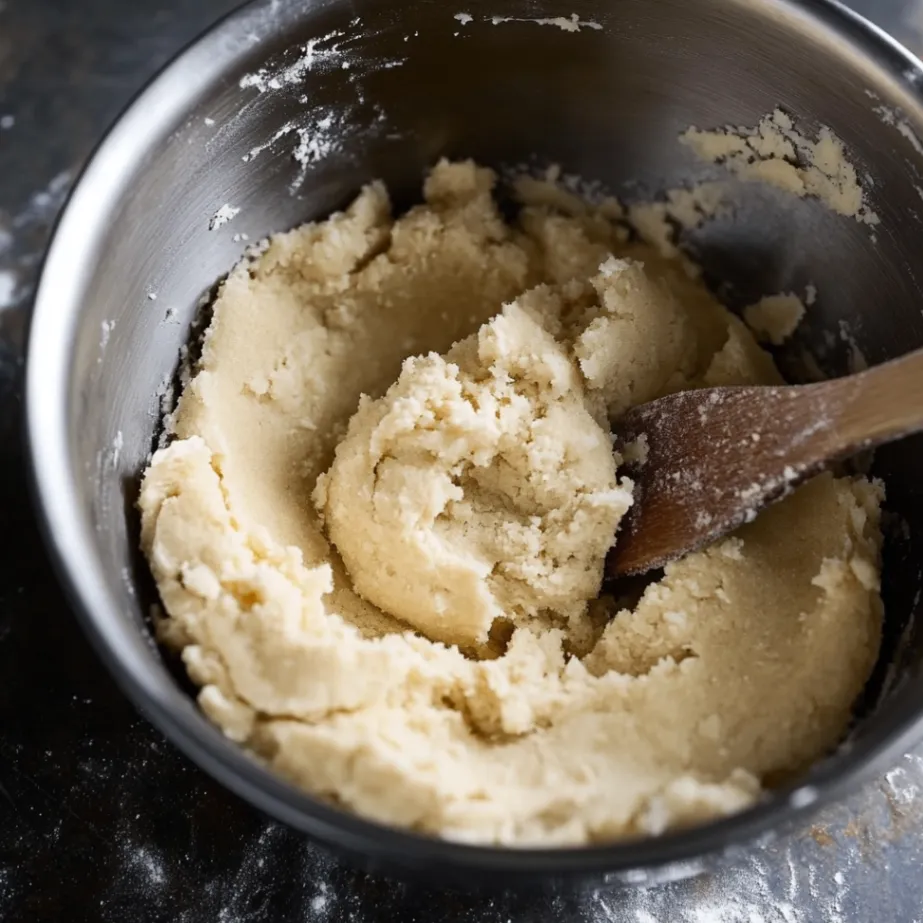
Once you’ve chosen your cookie stamp, it’s time to prepare the dough. I’ve experimented with various recipes but found that a classic sugar cookie dough works best for stamping. The dough should be soft enough to roll out easily but firm enough to hold its shape when stamped.
I remember one particularly frustrating baking session when my dough was too sticky, clinging to everything and making it nearly impossible to work with. To avoid this, I always chill my dough for at least an hour before rolling it out. This helps handle the dough more quickly and ensures the cookies retain shape while baking.
In addition to chilling the dough, I recommend using high-quality ingredients. The flavor of your cookies will shine through if you use real butter and pure vanilla extract. I once tried a recipe with margarine and imitation vanilla, and let me tell you, the difference was night and day!
The richness of real butter adds a depth of flavor that elevates these cookies from ordinary to extraordinary. Once your dough is ready, roll it out on a lightly floured surface to about a quarter-inch thickness, ensuring an even surface for stamping.
Rolling and Stamping the Dough
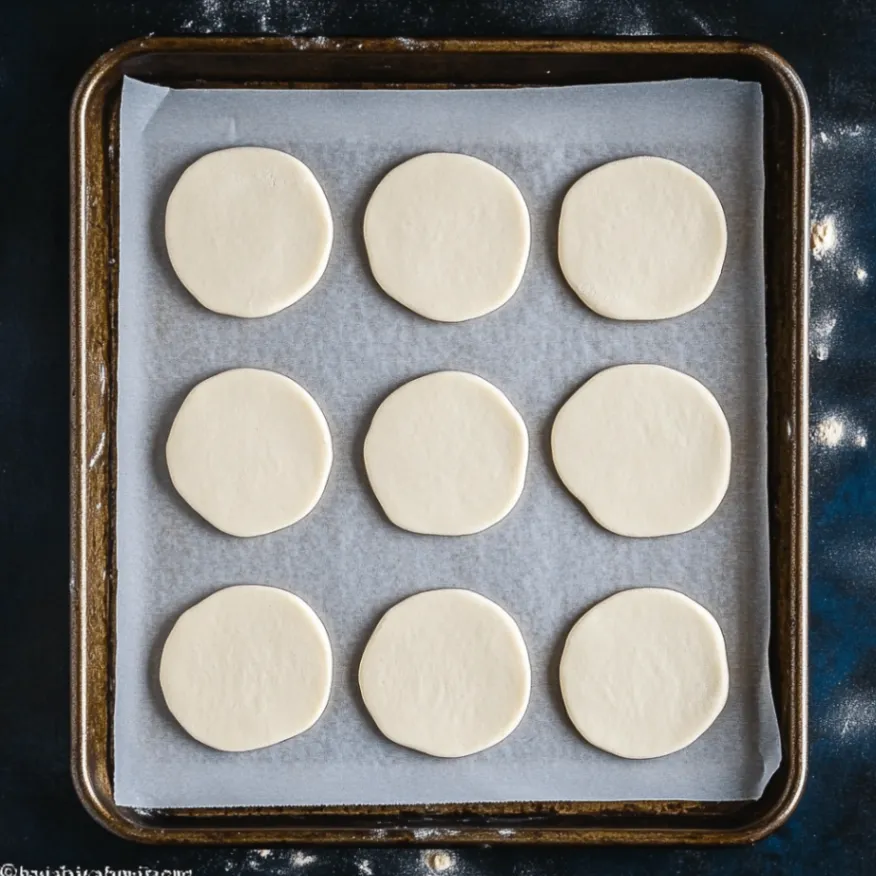
Now comes the fun part: rolling and stamping the dough! This step is incredibly satisfying as I watch my vision come to life. After rolling out the dough, I dust my work surface with flour to prevent sticking.
Then, using my favorite cookie cutter, I cut out shapes before pressing my spider web stamp into each piece. It’s important to apply even pressure when stamping; too much force can distort the design, while too little may not leave a clear impression. I remember getting overly excited and pressing too hard, resulting in a cookie that looked more like abstract art than a spider web!
I often create an assembly line to ensure each cookie has a consistent design. After cutting out several shapes, I’ll stamp them all in one go before moving on to the next batch. This speeds up the process and allows me to get into a rhythm.
Suppose your dough sticks to the stamp; dust lightly with flour or cornstarch before pressing down. This little trick has saved countless cookies from becoming casualties of sticky situations!
Baking the Cookies to Perfection
| Cookie Type | Temperature (°C) | Baking Time (minutes) | Golden Brown Color |
|---|---|---|---|
| Chocolate Chip | 180 | 10-12 | Yes |
| Sugar | 160 | 8-10 | Yes |
| Oatmeal Raisin | 170 | 12-15 | Yes |
Baking is where the magic truly happens, transforming our carefully crafted dough into delicious cookies. Preheating your oven is crucial; I always set mine to 350°F (175°C) well in advance so it’s ready when my cookies are prepped. One lesson I learned early on was to keep an eye on baking times; every oven is different, and what works for one may not work for another.
I recall a batch of cookies that overbaked because I got distracted by a phone call—not my finest moment! I recommend setting a timer for a minute or two less than the suggested baking time and checking for doneness to avoid this. When placing your cookies on the baking sheet, leave enough space between them; they will spread slightly as they bake.
I usually line my baking sheets with parchment paper for easy cleanup and to prevent sticking. As they bake, your kitchen will fill with an irresistible aroma that will have everyone eagerly anticipating their first bite. Once golden around the edges but still soft in the center, it’s time to take them out and let them cool completely on a wire rack before decorating.
Looking for a heartier cookie? Try The Best Clubhouse Oatmeal Raisin Cookie Recipe, packed with chewy oats and sweet raisins for a comforting bite.
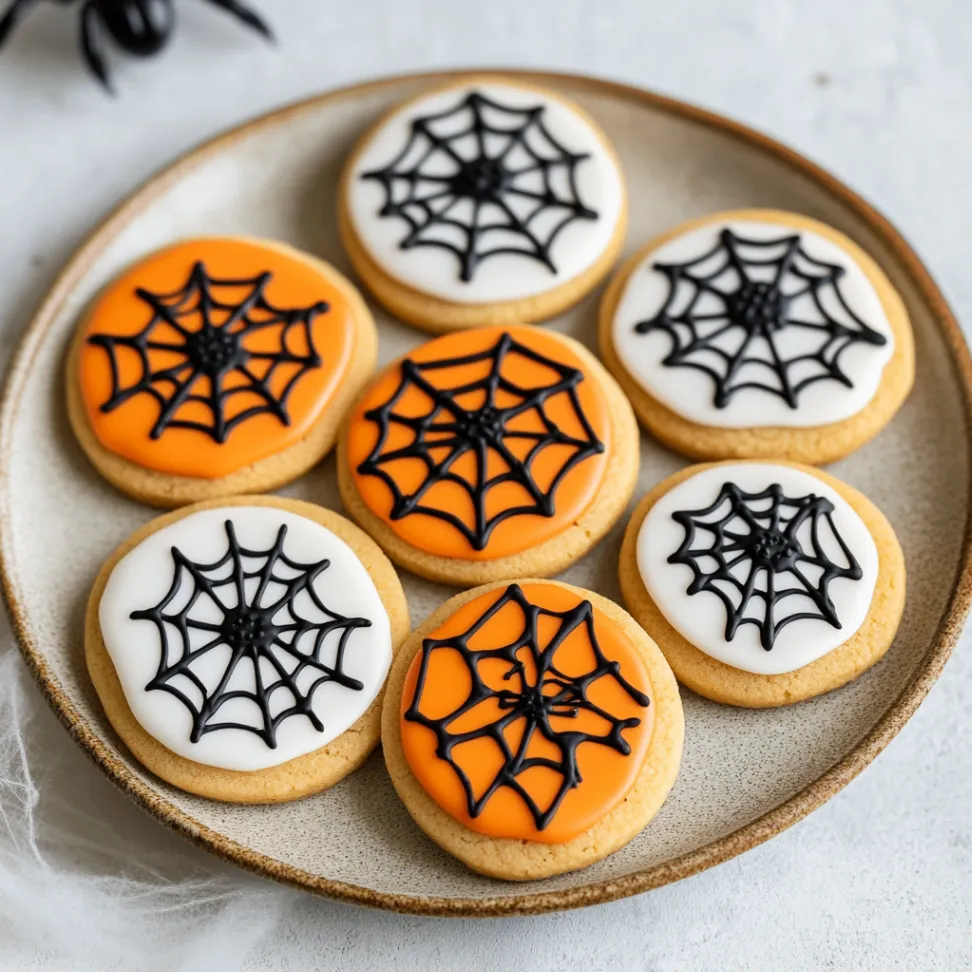
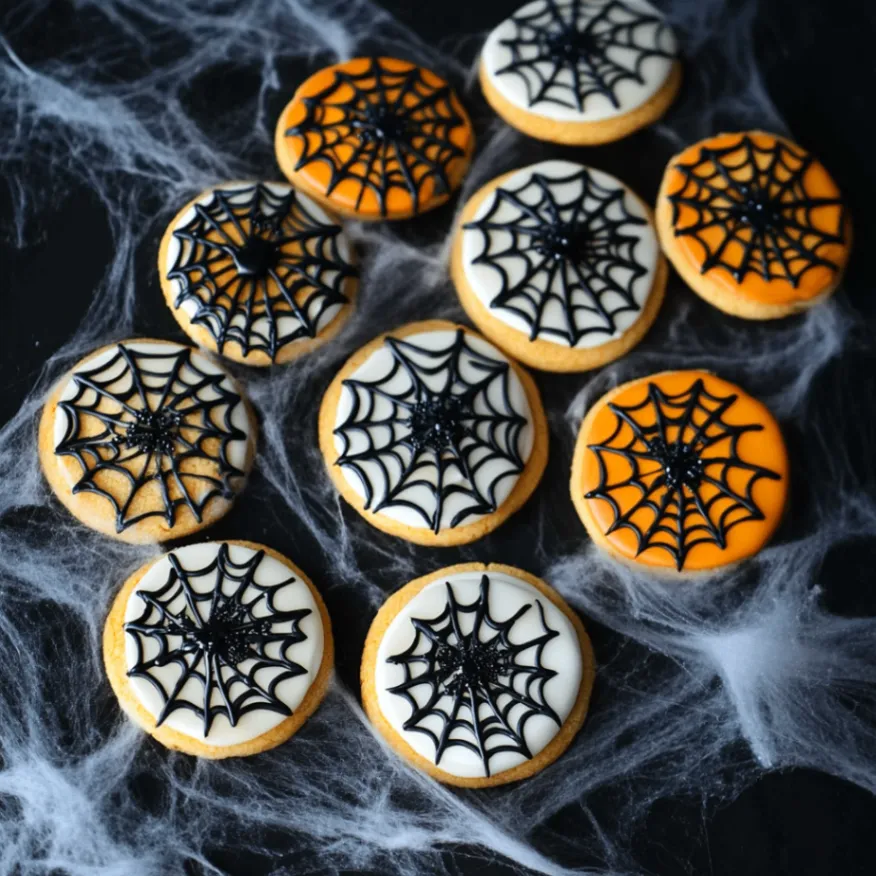
Decorating and Icing the Spider Web Cookies
Decorating spider web cookies is a great way to let your creativity shine! After allowing my cookies to cool completely, I whip up a batch of royal icing—my go-to for detailed designs. The beauty of royal icing is its versatility; with just a few adjustments in water content, you can achieve both flooding and piping consistency.
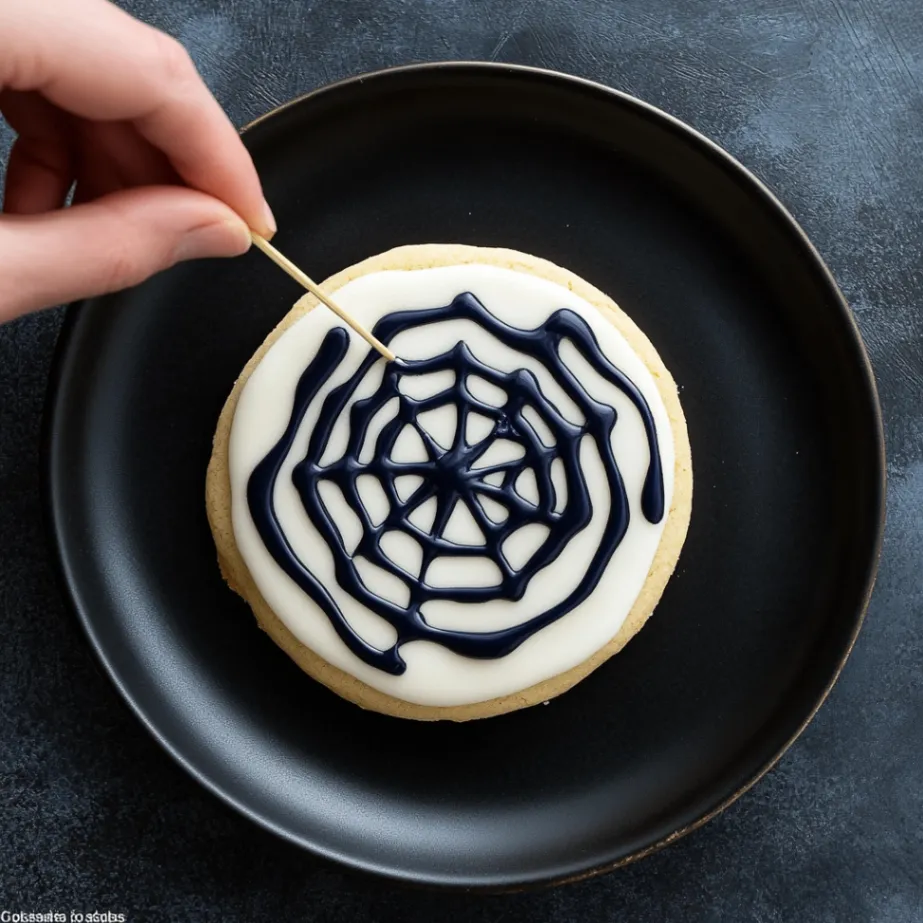
I remember my first attempt at decorating these cookies; I was so eager that I didn’t let my icing dry appropriately before adding details, resulting in a messy outcome. Now, I always allow each layer of icing to dry before moving on to the next. For spider web cookies, I like to start with a base layer of white icing and let it dry completely before adding black or dark gray icing for the web design.
A piping bag with a small round tip makes creating delicate lines that mimic a spider web easy. A fun tip I learned from a fellow baker is to use a toothpick or skewer to drag lines from the center outward, creating that iconic web effect. It’s a simple technique that adds so much character to each cookie!
Storing and Packaging the Finished Cookies
Preserving the Perfection
Once your spider web cookies are beautifully decorated and ready to impress, storing them properly is essential to maintaining their freshness. I’ve learned from experience that leaving them uncovered can lead to hardening or drying out—not what you want after all that hard work!
Storage Solution
Instead, I place them in an airtight container lined with parchment paper between layers to prevent sticking. This method keeps them soft and delicious for days.
Gift-Worthy Packaging
Consider creative packaging options if you’re planning to gift these spooky treats or bring them to a party! I love using clear cellophane bags tied with festive ribbons or placing them in decorative boxes adorned with Halloween-themed stickers. This makes for an eye-catching presentation and adds a personal touch that shows you care about your treats as much as your recipients will enjoy them.
Troubleshooting Common Issues
Even seasoned bakers encounter hiccups along the way, so it’s essential to know how to troubleshoot common issues when making spider web cookie stamp cookies. One problem I faced early on was cookies spreading too much during baking, resulting in distorted designs. After some research and experimentation, I discovered that chilling the dough longer before baking helps maintain its shape significantly.
If you are in this situation, don’t hesitate to pop your cut-out cookies back in the fridge for 10-15 minutes before baking. Another common issue is icing consistency; if it’s too runny, it won’t hold shape when piped onto your cookies. Conversely, if it’s too thick, you’ll struggle to create those delicate lines needed for spiderwebs.
A simple fix is adding small amounts of water or powdered sugar until you reach your desired consistency. Remember, practice makes perfect! Each batch is an opportunity to learn and improve your technique.
Refer to the Ultimate Cookie Troubleshooting Guide by Handle the Heat for comprehensive guidance on resolving common cookie-baking issues. This resource offers detailed solutions to problems like cookies spreading too much, turning out too thick, or having an undesirable texture.
Creative Ways to Use Spider Web Cookie Stamps
While spider web cookie stamps are perfect for Halloween-themed treats, their versatility allows for year-round creativity! One of my favorite ways to use these stamps is during autumn gatherings; they can easily be adapted for Thanksgiving by using fall colors like orange and brown icing instead of traditional black and white. Imagine serving pumpkin spice cookies adorned with spider webs—a fun twist!
Additionally, these stamps can be used for themed parties or events beyond Halloween! For instance, if you’re hosting a spooky movie night or a haunted house gathering, spider web cookies can be an excellent addition to your snack table. You can even experiment with different flavors by incorporating spices or extracts into your dough—think cinnamon or almond!
The possibilities are endless when you let your imagination run wild with these delightful cookie stamps!
Want to experiment with vibrant, eye-catching cookies? Check out Colorful Ingredients in Some Cookie Recipes for fun and creative ways to brighten your baked goods.
FAQs
What is a spider web cookie stamp?
A spider web cookie stamp is a tool to imprint a spider web design onto cookie dough before baking. It creates a decorative pattern on the cookie’s surface.
How do I choose the proper cookie stamp for spider web cookies?
When choosing a cookie stamp for spider web cookies, look for one with a precise and intricate spider web design. The stamp should also be made of food-safe materials and have a comfortable handle for easy use.
What is the best way to prepare the cookie dough for stamping?
It should be chilled and firm to prepare the cookie dough for stamping. This will make it easier to roll out and stamp without the dough sticking to the stamp.
How do I roll and stamp the cookie dough for spider web cookies?
Roll out the chilled cookie dough to a consistent thickness, then press the spider web cookie stamp firmly into the dough to create the design. Lift the stamp carefully to reveal the imprinted pattern.
What are the best practices for baking spider web cookies to perfection?
Bake the stamped cookies on a parchment-lined baking sheet at the recommended temperature and time specified in the recipe. Watch the cookies to ensure they do not overbake and lose their shape.
What are some creative ways to decorate and ice spider web cookies?
After baking, spider web cookies can be decorated with royal icing, colored sugar, or edible glitter to enhance the spider web design and add a festive touch.
How should I store and package the finished spider web cookies?
Once decorated and thoroughly cooled, store the spider web cookies in an airtight container at room temperature. Place the cookies in a decorative box or tin lined with parchment paper to package for gifting.
What are some common issues when making spider web cookies with a cookie stamp?
Common issues when making spider web cookies with a cookie stamp include the dough sticking to the stamp, the design not transferring clearly, and the cookies spreading too much during baking.
What creative ways do you use spider web cookie stamps beyond making cookies?
In addition to making cookies, spider web cookie stamps can imprint designs on fondant for cake decorating, create decorative patterns on pie crusts, or even make stamped chocolates for Halloween treats.
1 thought on “7 Tips for Perfect Spider Web Cookie Stamp Cookies Every Time”